Showing posts with label diorama. Show all posts

Sunday, August 19, 2007

Sweet Victory! Sweet Experience!


My winning entry(Tamiya Modelling Competition 14-19 Aug 2007).
Peace,
All praises and thanks to God, the Lord of the worlds. It was a gloomy and rainy day at Millenia Walk but it was a fun and exciting experience for me at the Tamiya Modelling Competition 2007. All because my entry was a winner at the dioramas section. It was even sweeter cause this is my first time taking part and second diorama I attempted since picking the hobby up again after many years.

I'm glad that I documented the WIP in pictures and be able to remember this sweet memory for years to come. Of course this will inspire me to go for more challenging projects ahead. God willing.

Here are photos of the 5-day event and some of the modelling winners. Enjoy! Hurray! More pics at the convention:http://www.outthere.info/tamiyacon07/page1.htm


Tuesday, August 14, 2007

Project: Falaise Pocket Argentan COMPETITION DAY!

Peace to all,

Today is competition day and I took a few more photos and did last minute touch-ups after dat. Here are the photos. I have taken out some things and added some if you noticed. I took out the street lamp cause I placed the anti tank gun further back behind the archway. Another change was that I added posters at the side of the building.


Let me describe to you all the whole process of this project. It went like this:

Stressful: cause I am worried whether I could finish in time. I spend bout 2 1/2 months of my time for this one. There's only 1 competition a year. I don't wanna wait another year.


SHOCKING cause I see no one at the competition. I'm very early! Do they give points for that? Darn! Judging is on Sunday.


RELIEF cause now I can relax and wind down and wait for the outcome.
Hopefully I could get a placing in the competition and have some more fun and fufilling modelling days ahead. Lets see what happens this Sunday. I'll snap more photos of the competition when I go back one of these days.

WIP: Falaise Pocket 6 Argentan

After the figures were all done, I started on the M4 Sherman. I airbrushed it with a base coat using Vallejo's olivedrab and light olive in a ratio of 1:8 and it turned out too bright for me. So I repainted it with olivedrab. It nows turns out to be too dark for me.

What I did next was to apply a filters (very diluted light olive) a few layers till it has light coloured patches. I read this from an article from missing-links site. Its very informative cause I did'nt know that washes had different varieties. After thats done, I applied a coat of mat varnish to lock the colours down.


In between I put together the scene to check whether everything fits well.


As I was relaxing, I saw an image of a flag on the building's 3rd storey and got the idea to scratchbuild a German flag. At first I wanted to use a cloth as the flag but it was very difficult to get the shape that I wanted. In the end I experimented using plain printing paper and it turned out fine. At least to my eyes.

Next step, I weathered the tank and figures with the Tamiya weathering set to blend everything together. The tracks of the tank were weathered with flat earth colour and also drybrushed with a mixture of tile grout and earth colours. The Geramn fuel drums were painted with Mr Colour German Grey and weathered with rust colour from Humbrol.
So below is the almost complete setup. I know I forgot to explain something but anyway here you go.

Saturday, August 11, 2007

WIP: Falaise Pocket 5 Argentan

Next step, I weathered the cobblestone by applying fine sand over diluted PVA glue. Then I applied burnt sienna wash onto the sand to weather it abit.


As you can see now the rubble pile I made earlier have been glued together and glued onto the base and painted and drybrushed with blacks and greys and finally some brick and sand colours.

The exciting part of course is the figure painting. Here are some stages of painting. I used acrylics thruout but used a combination of figure painting techniques of oil and acrylics painting(from the Historicus Forma and Finescale forum). I think I did okay with the technique I devised.

Batch painting in progress...


For the skin I mainly used Dark flesh, dwarf flesh and elf flesh all from citadel miniatures paint.The acrylic technique is called feathering. Though it turned out well, I still believe paintings in oils is the ultimate goal. Next time I'll try dat.

Saturday, July 21, 2007

WIP: Falaise Pocket 3 Argentan

Okay the next step I did was to make some bricks of differet sizes from paper clay and foamboard. These would later be added to my rubble pile and as strewn debris.


With the building ready to be painted I had bouts of "itchy fingers" and began scratch building miniature furniture to furnish my building. I used combination of balsa, tooth picks and scrap wood to create these. Suddenly I was asking myself, " Am I building a war dio or doll house?"


I began putting together everything to see what position looks good. I replaced the Cromwell tank with an M4 Sherman. Also, I began piling up
rubble and broken wood inside the building to see how the combination presents itself and whether I need more materials to complete this.(Cont' next post)


Friday, July 20, 2007

WIP: Falaise Pocket 2 Argentan

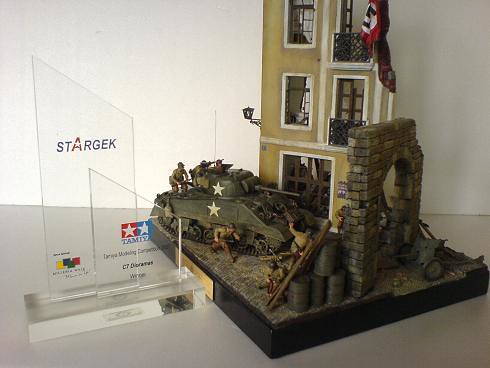
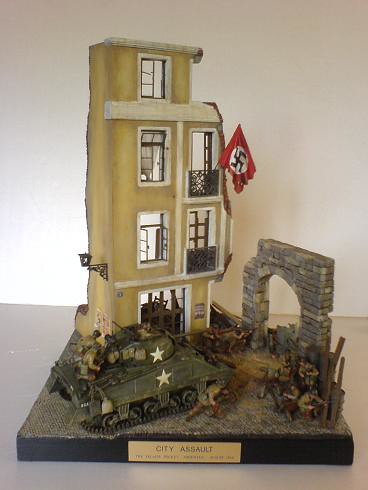
My plan was to create the diorama going from right to left but the Normandy building which I was looking for was not avalable yet and so I bought another Miniart model. I decided to change the direction looking from left to right since the building looks better that way.


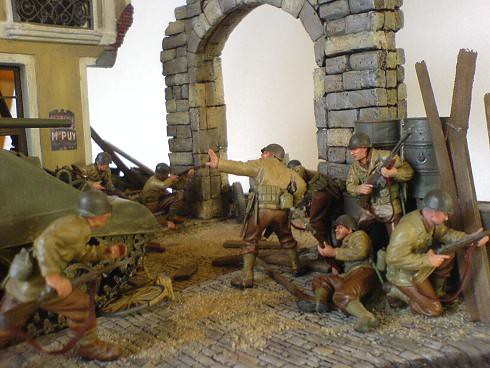
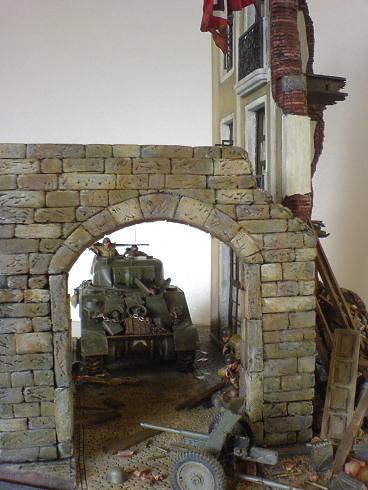
The next step was to make the cobblestone pavement leading to the archway. I simply used foamboam and glued it onto the wooden base with PVA glue. Later I would score the cobblestone pattern onto them.

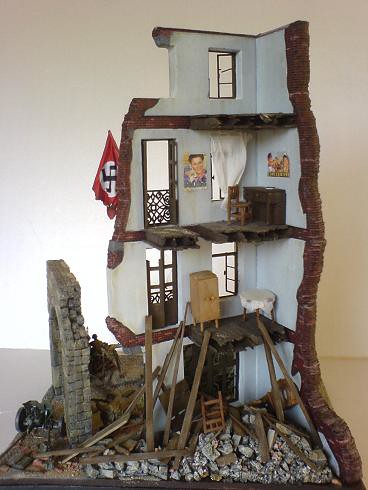
It's time to work on the Normandy city building. Yeh! I was excited at first when I first got it since it was the first time I ever bought a building. My LHS guy warned me about the rough work ahead since he build one a couple of months before and there's plenty of puttying and sanding to do but I guess I was too excited since it would be easier than scratch building one myself.


The most challenging portion about this build is cutting off the excess parts (windows and doors) since the front and back needs to be level so that it would joint evenly. Of course that was not possible and I ended up applying putty and sanding the joints to make it flat and even.


Then I followed up by scratch building the archway. Okay this was an idea I got from someone's website(can't remember the address sorry). The method was to use tile grout and pour it into a plywood mould and to create tiny bricks that looks realistic. Since I have some grout to spare I experimented with it. The dreaded part of this method was the mould building. The tedious part is definitely the moulding process. It gets messy and you have to wait 24 hours for one batch of about 20 bricks to dry. Anyway I ran out of grout to mould (got bout 40 bricks)and combined them with foamboard cut into small brick shape and glued them together to make the archway.


The cobblestone road was made using paper clay. Before the clay dried, I scored lines to create the cobblestone road.(cont' next post)